WHALEBONE PLANKS
LAYING INSTRUCTIONS
C 10.0
C 10.0
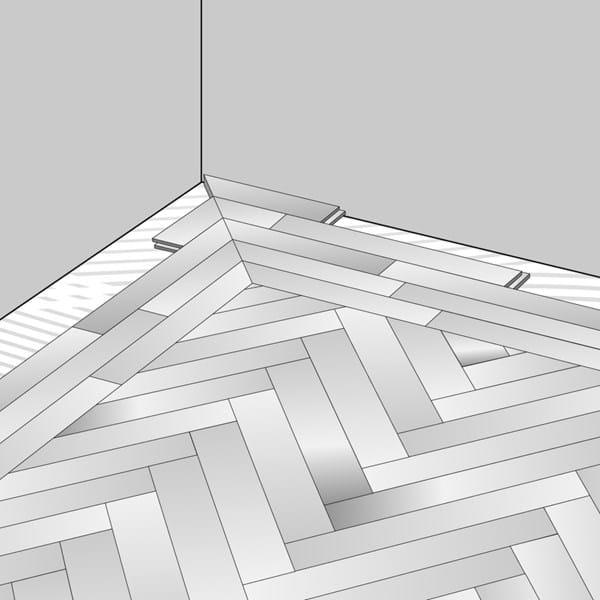
Fig. 1, Whalebone (Herringbone planks)

1. GENERAL INFORMATION
Junckers Whalebone planks also named herringbone planks (Figure 1) are a variant of the classic herringbone flooring, which has been known for centuries.
This information describes installation of the planks in a herringbone pattern, but since these are supplied both as right- and left-handed, it is only the imagination that sets the limit for choice of pattern. See the difference between a right- and left-handed plank in figure 2.
The planks have undergone a thorough quality control at the factory. However, it is important to check for defects before and during installation.
The planks are available untreated or surface treated from the factory and are delivered in packs clearly marked as either right- or left-handed planks.
Fig. 2, Left/right plank
DIMENSIONS:
Thickness x width x length:
- 15,0 x 129 x 775 mm (5/8” x 5” x 30.5”)
- 20,5 x 140 x 701 mm (3/4” x 5.5” x 27.5“)
- 20,5 x 185 x 741 mm (3/4” x 7 3/8” x 29 3/16”)

If the planks are glued down, a minimum of 24 hours must elapse after gluing before start of using the floor.
2. BEFORE DELIVERY - RH IN THE BUILDING
Before the materials are delivered, the relative humidity in the building must be within the range expected when in use, e.g. 35-65 %, and the temperature must be approximately
20 °C (68 ° F).
If the temperature and relative humidity levels cannot be met, we ask you to contact Junckers before delivery.
For the sake of the temperature, the planks should be delivered 1 or 2 days before installation is due to begin.
The planks must not be unwrapped until immediately before laying as it is important that they are as close to the manufacturing condition as possible.
3. ENVIRONMENTAL CONDITIONS
In order to keep moisture related movements of the floor to a minimum, the relative humidity should be stable for extended periods of time. The humidity range, i.e. the difference between the lowest and the highest relative humidity during the year, should not exceed 25 to 30 %- points.
Examples of humidity ranges are: 25-50 %, 35-65 % RH.
The instructions below are based on the range 35-65 % RH.
If site conditions should vary from the above, it is advisable to contact Junckers Technical Service Department for advice.
4. BEFORE INSTALLING THE FLOOR
The building must be dry and weathertight. The heating system must be installed, tested and in operation during the heating season.
Cast concrete, screeds and other interior work, which can bring moisture into the building, e.g. tiling, plastering and painting, must also be completed.
5. UNDERFLOOR HEATING
Wooden floors over underfloor heating demand an even temperature distribution in the subfloor and the temperature of the wooden floor surface must not exceed 27 °C (81 °F)
The underfloor heating must be switched off for 2 days before installation is started. After installation the heating can be raised slowly by a maximum of 5 °C (41 °F). every second day. However, the working temperature for the adhesive must be minimum 15 °C (59 °F).
By using underfloor heating as heat source the natural gaps, always present between the planks in the heating season, will appear slightly larger compared to heating from radiators.
6. SUBFLOORS
General information:
The planks can be screwed, nailed or glued to a subfloor of plywood / existing wooden floor or screwed or glued to a chipboard base. Furthermore, they can be glued down to a concrete or screeded subfloor. All types of subfloors must be cleaned for dirt and grease, before installing the planks.
The moisture content of a wood based subfloor must not exceed 12 %. For concrete/screeded subfloors the moisture content must not exceed 65 % RH. See also the section about concrete/screed.
When screwing or nailing, a 500 g/m² (0.10 lb/ft²) floor cardboard is to be inserted between the wooden subfloor and the planks in order to minimize creaking between the planks and the subfloor. Each plank is fixed by secret nailing/screwing at a 45° angle with at least 2 nails or screws per plank. If screws or nails are used to fasten the planks, it is recommended to use 20.5 mm (3/4”) plank thickness. This for the sake of the strength of the tongue.
Fastening to subfloor: 20.5 (3/4”) x 140/185 mm (5 1/2” / 7 3/8”):
- Nailing: Junckers J-nails or 45 mm (1 3/4″) T-nails for nail gun.
- Screwing: 45 mm (1 3/4″) Monta-Flex screws or similar. By screwing it is necessary to pre-drill.
- Gluing: Junckers Parquet Glue.
Fastening to subfloor, 15 (5/8”) x 129 mm (5”):
- Gluing: Junckers Parquet Glue.
Whalebone planks must NOT be glued in the tongue and groove. However planks shorter than 100 mm (3 15/16″) may as an exception be glued in the heading joints at walls or borders and in the tongue and groove at the last row of planks. If the floor is to be installed with a border, see section “Finishing with a border”.
Existing wooden floor:
In order to achieve the correct surface flatness, the subfloor can be levelled by planning, filling or by fixing a minimum 15 mm (9/16") thick plywood to the base. It is important to ensure that the existing wooden floor has been properly fixed and are without jarring sounds.
Plywood floor:
Plywood subfloors must be minimum 19 mm (3/4″) thick with a batten distance of maximum c/c 520 mm (20.5'').
When plywood is being fixed to an existing timber base, boards 15 mm (5/8”) thick may be used.
The plywood must be glued in tongue and groove.
Chipboard floor:
Flooring grade chipboards 22 mm (7/8'') thick can be used and laid on battens with maximum support centres of 600 mm (23 5/8").
If the chipboards are laid on an existing floor, it must be approved chipboards of minimum 16 mm (5/8″).
The boards must be fitted according to the manufacturer’s directions and must be glued in the tongue and groove joints.
Concrete/screed:
When gluing, it is not possible to use a conventional damp-proof membrane. It is therefore very important to ensure that the surface of the subfloor is smooth, clean and dry. The residual moisture in the subfloor must thus not exceed 65 % RH, which must be checked by measuring. For more information see technical data sheet C 1.3 General information gluing down floors, section "Measurements of moisture in subfloors".
In case the floor installation needs to be conducted, with a moisture content between 65-95 % RH in the concrete subfloor, or in case of underfloor heating, apply Junckers Liquid Moisture Barrier before gluing. For more information see technical data sheet "Liquid Moisture Barrier" H 6.5.
Different types of subfloors in same floor area:
If several types of subfloors make up the same floor area, the subfloor must be of uniform elasticity and flatness to ensure that the final flooring is of a consistent nature.
Glue Down method
- For gluing the floor use Junckers Parquet Glue.
- The adhesive is applied using the Junckers notched Glue Spatula leaving a thin glue coat on the floor between the glue tracks.
- Hold the spatula at an angle of 45° and with the side marked ”2” turned downwards.
- Use approximately 0.5 litre per m² (≈ 17 fl oz/ft²), depending on the absorption capacity, structure and flatness of the subfloor.
- Only apply sufficient adhesive, so that the laying of the tiles can be finished within 20 minutes.
7. FLATNESS OF THE SUB FLOOR
The subfloor must be levelled so that any deviations in the flatness do not conflict with the requirements of the method stated below.
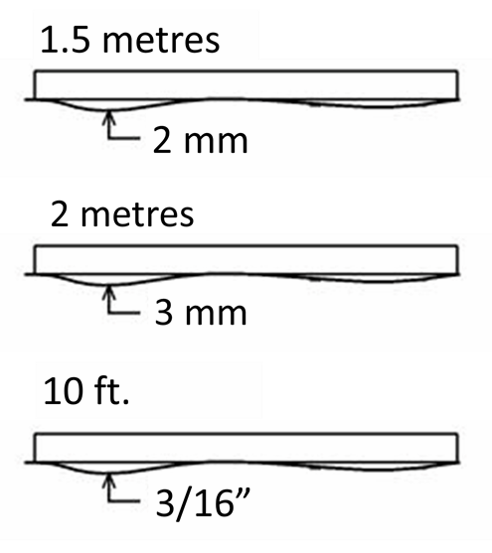
Straight edge:
The subfloor must be flat with a maximum deviation of 2 mm under a 1.5 m straight edge.
(UK: 3 mm under a 2 m straight edge).
(US: 3/16” under a 10 ft. straight edge).
Deviations are measured as gaps under the straight edge. The surface must be smooth. Any irregularities must be corrected by grinding or by using a self levelling compound.
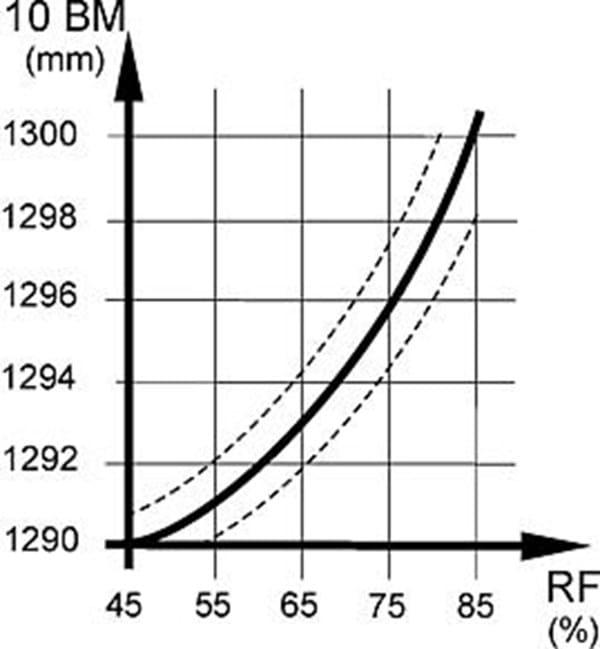
8. 10-BOARD MEASUREMENT
Wooden floors slightly shrinks/expands, when the temperature and humidity is changing. It is therefore necessary to install according to a 10-board measurement, when laying whalebone planks in patterns, where the planks are placed parallel over larger distances, e.g. a ladder pattern. Please note that this instruction does not apply to the herringbone pattern.
The 10-board measurement indicates the expected width measured across 10 planks at the most humid period of the year. The 10-board measurement for 15x129 mm (5/8” × 5”) Whalebone planks, indicated at an expected relative humidity between 35-65 % and a room temperature at 18-22 ˚C (64–72 °F) is 129.2-129.4 cm (50.8" - 50.9")
If you have any questions, please contact Junckers.
9. DISTANCE TO WALLS AND EXPANSION GAPS
In order to allow natural movements of the floor, a distance to walls and fixed installations must be kept. 12 mm (1/2'') for areas in a width or length up till 12 metre (39' 4''). Hereafter an addition of 0.5 mm per meter.
Example: A 30 metre wide/long (98' 5'') area: 12 mm (1/2'') + (18x0.5)(11/16″ x 0.19'') = 21 mm (13/16″).
We recommend that expansion gaps are established in the following cases: By conditions with large variations in temperature and humidity, with particularly large floor areas, or where the floor is naturally divided by doors etc.
Furthermore, any structural movement joints in the sub floor of the building must be taken up through the wooden floor if this is glued down to the subfloor.
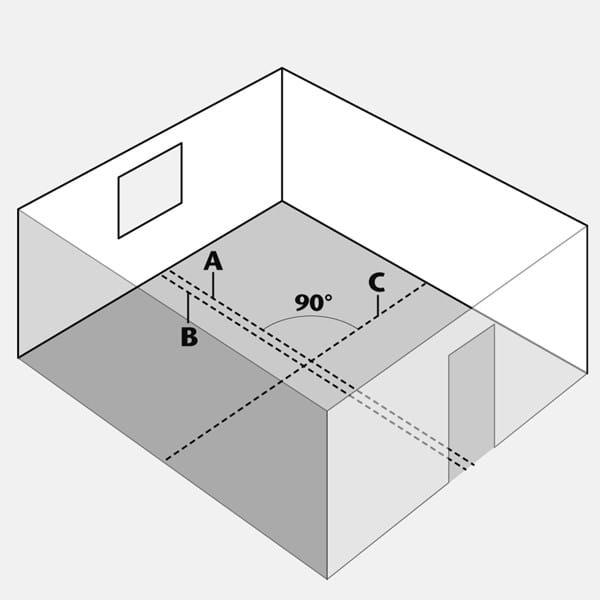
INSTALLATION - PART 1
The two centre lines in the room (lines A and C) are marked by a chalk line or string at an angle of 90° to each other.
Left of the centre line (A) a working line with a string or chalk line (line B) is drawn.
Distance between A & B: See "Installation part 2".
INSTALLATION - PART 2
The corners of the planks must be in line with the working line (line B).
In order to regulate the laying direction of the starting row, the centre line (line C) can be used as regulating line for the corners on the right- and left-handed planks, respectively. Left-handed planks are laid to the left and right-handed planks are laid to the right. By this the herringbone pattern is established.

Plank dimension 15 x 129 x 775 mm
(5/8” x 5” x 30 1/2”)

Plank dimension 20,5 x 140 x 701 mm
(3/4” x 5 1/2” x 27 1/2“)

Plank dimension 20,5 x 185 x 741 mm
(3/4” x 7 3/8” x 29 3/16”)
INSTALLATION - PART 3
During the entire installation phase, it is very important to make sure that the planks are at an angle of 90°.
Particularly at the starting rows (the two first rows of planks, which are laid down through the room, it is important to ensure that these rows are exactly at an angle of 90°.

INSTALLATION - PART 4
When the starting row has been laid it is recommended to leave the adhesive to dry overnight, before installing of the floor continues.
Do not forget to remove excess adhesive from the floor.
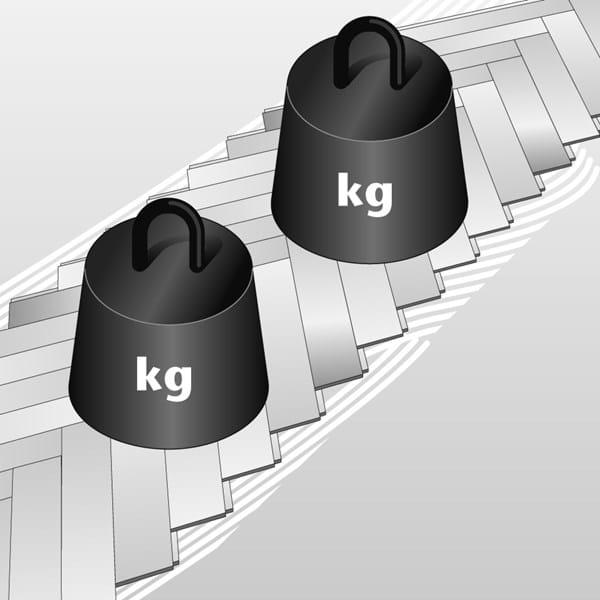
It is advisable to load the floor continuously during laying to ensure a good bond between the planks and subfloor. Some contractors use packs of flooring or adhesive containers for this purpose.
INSTALLATION - PART 5
When the adhesive in the starting row is dry, you can continue laying the floor.
You must only apply adhesive in an amount, enabling you to finish laying the planks within 20 minutes.

INSTALLATION - PART 6
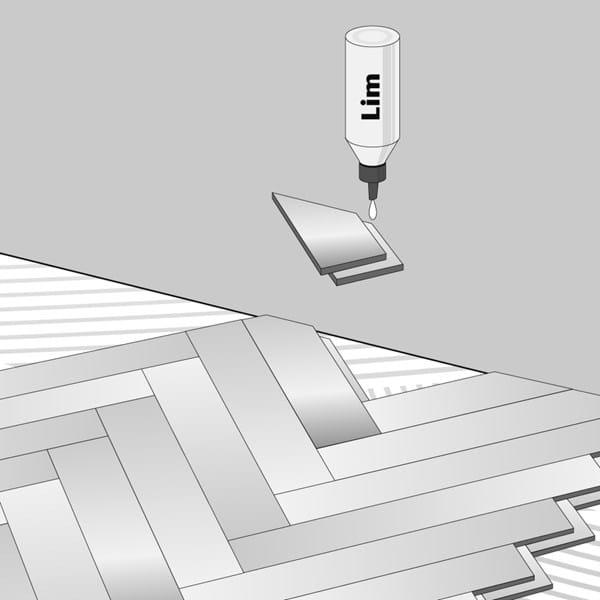
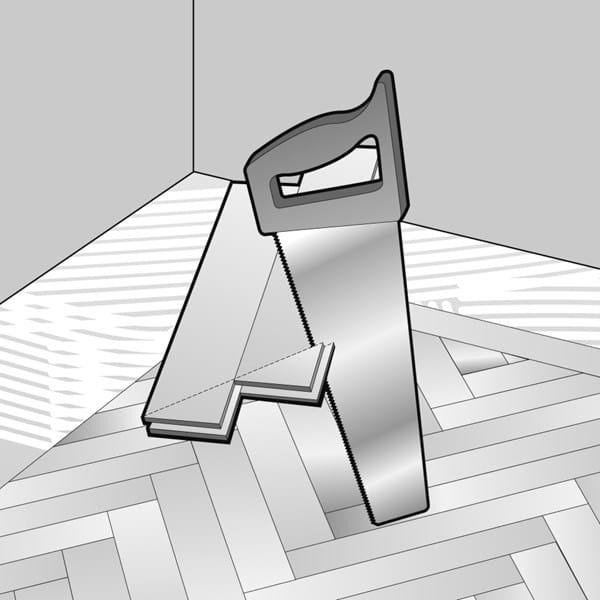
If the planks are cut at the border or wall making them shorter than 100 mm, the tongue and groove joints of the planks may as an exception be glued.
FINISHING WITH A BORDER - PART 1
The floor can be beautifully framed with a border in the same wood species as the rest of the floor or in another wood species to obtain more contrast.
If the floor is to be finished with a border at the walls, the floor is cut at the required distance from the wall corresponding to the desired width of the edging, e.g. 2 x the plank width + distance to the wall.
Example with 20.5 (3/4'') x 140 mm (5 1/2'') planks, 2 planks used as border:
2 (0.07'') x 140 (5 1/2'') + 12 mm (1/2'') for air = 292 mm (11 1/2″)

FINISHING WITH A BORDER - PART 2
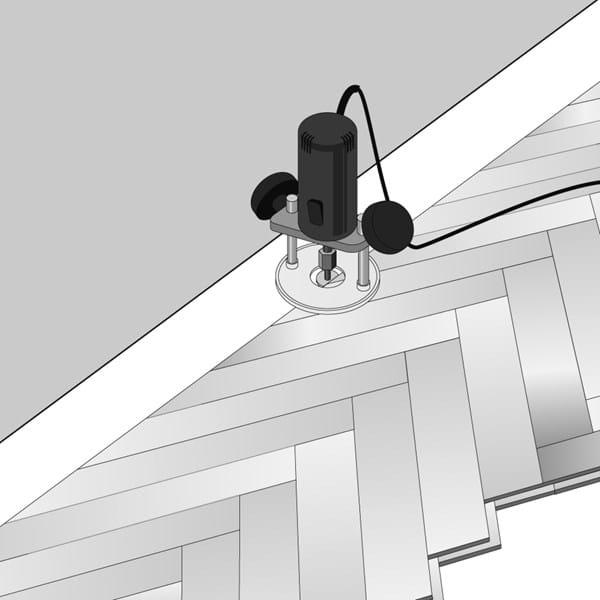
To be able to join the border to the main floor, a groove is cut in the floor edge with a router.
The groove must match the thickness of the tongue of the planks and be placed in a distance from the upper side of the floor to ensure that landing deviations are avoided.
FINISHING WITH A BORDER - PART 3
Before gluing, the border planks are cut to form a mitred corner and a groove is routed in the plank edges to enable a loose tongue to be fitted.
FINISHING WITH A BORDER - PART 4
Hereafter the planks are glued down to the edging.
It is advisable to load the floor continuously during laying to ensure a good bond between planks and subfloor. Some contractors use packs of flooring or adhesive containers for this purpose.